Ghost Theme Development - The Ultimate Guide
In June 2021, I moved the website you're currently reading this article on from Wordpress to Ghost (Ghost.org).
After developing eCommerce websites on Shopify for a few years, I realised just how antiquated a system like Wordpress is. It's bulky, slow and built with old technology.
Ghost by comparison is modern, fast and efficient.
Ghost obviously doesn't have the level of brand awareness that Wordpress has and so you'll inevitably find less resources for learning how to develop on the platform.
For this reason (along with some annoying gaps in their documentation) I was prompted to create a complete class on the subject of Ghost themes to which this guide is the compliment to.
Just like my Ultimate Guide to Shopify Liquid, I'll be going as in-depth as possible into Ghost theme development so strap yourselves in!
Note that I will reference the official documentation where I feel it makes sense to do so, rather than repeating the same information, especially on the much less common features.
Ghost Theme Development Basics
Much like Shopify, the theme in Ghost controls the front-end of your website. It's de-coupled from the Ghost backend and is coded in the popular Handlebars templating language.
Unlike Shopify though, there's not a big focus on objects in Ghost Theme Development. Instead, scope is referenced by something called 'context' and the template structure more closely resembles that of Wordpress.
As Ghost is built for publishing, collections and posts form the basis of your Ghost theme.
A blog - at its most basic form - is simply a collection of blog posts.
Therefore, the only required templates in Ghost themes are the index.hbs and post.hbs templates.
In this article, we'll break down Ghost theme development into the following:
- Templates
- Routes
- Contexts, and
- Helpers
Let's start with how a Ghost theme is structured.
Theme Structure
As mentioned, the only templates required in a Ghost theme are index.hbs and post.hbs.
index.hbs is the template used for displaying the collection of posts stored on your Ghost site and is served on root route (homepage) by default.
post.hbs doubles as both the template for displaying single blog posts as well as single pages.
default.hbs while not required, carries surrounding code that is common to multiple (if not all templates). When called within a template, the template code will sit inside the {{ body }}.
On top of index.hbs and post.hbs are a bunch of additional optional templates which will replace these templates on certain routes.
The following diagram demonstrates the optional templates that sit ahead of index.hbs and post.hbs
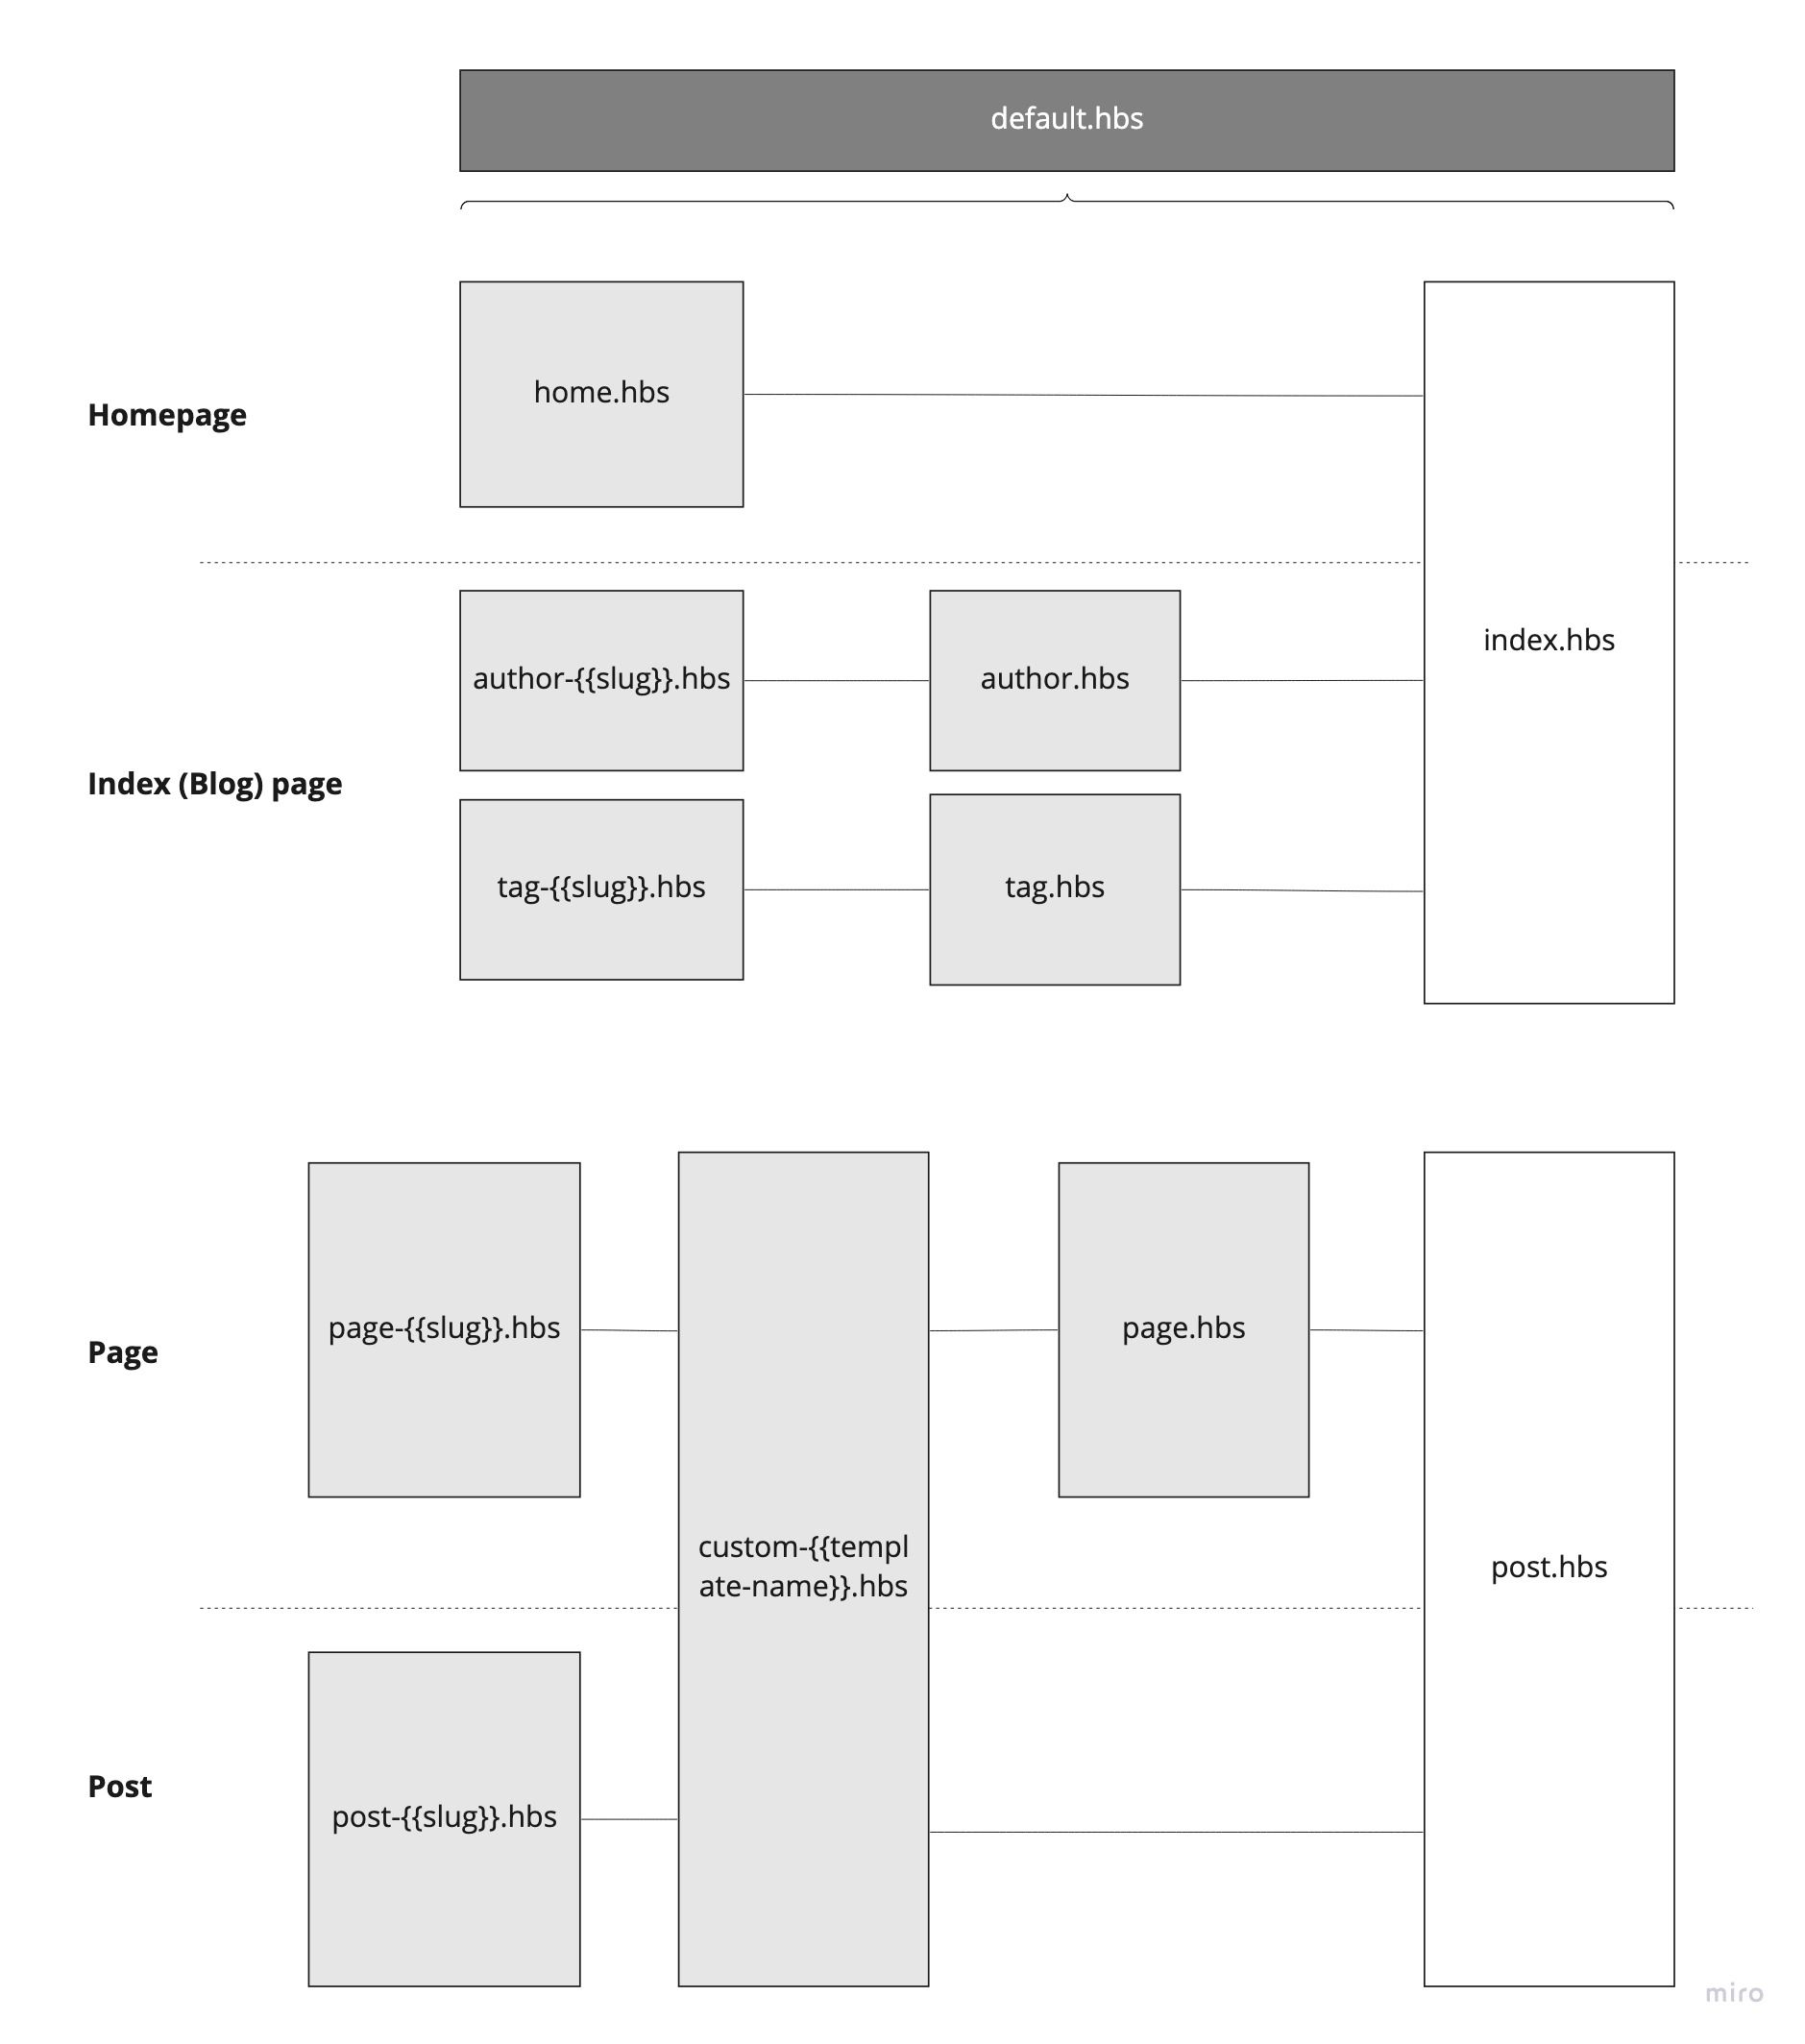
From left to right, you have the page (or route) that the user is viewing followed by the list of possible templates. The {{slug}} and {{template-name}} represent dynamic values that I'll explain in just a second.
The templates furtherest to the left are the ones that will get loaded ahead of the other templates if they exist. If they don't exist, the next template in line will determine what gets displayed on the route.
For example, when viewing posts with the tag of 'example', if a tag-example.hbs file exists in the theme folder, that file will be served. If that file doesn't exist but a tag.hbs file exists, that tag.hbs will be served and if neither are true, the template served will default to index.hbs.
default.hbs - as can be seen from the diagram - wraps around which ever template is loaded and its code is served alongside it.
When it comes to viewing a page (as another example), the template loaded can be one of 4 different templates.
- If the
pagehas a page-specific template, that template will be served. Page-specific templates start with "page-" followed by the slug of the specificpage. - A custom template that is selected on the
page's edit page within the admin. These templates start with "custom-" followed by the custom template name. - The
page.hbstemplate, or - The
post.hbstemplate
As the diagram shows, the page-specific template will receive priority followed by the custom template (if set on the page), followed by the page.hbs template and if none of those exist, the post.hbs template will be used by default.
Setting and updating routes
While technically not a part of theme, the routes.yml file plays a large part in determining what templates get served on each route and allow you to customise the path as well.
The routes.yml file can be found outside your theme folder in /content/settings/ and looks like this by default:
## routes.yaml

routes:

collections:
  /:
    permalink: /{slug}/
    template: index

taxonomies:
  tag: /tag/{slug}/
  author: /author/{slug}/
The default site structure (under the above configuration) places your index.hbs on your root (/) path and allows for filtering of posts via /tag/{slug}/ (where {slug} represents the slug of the tag) and /author/{slug}/ (where {slug} represents the slug of the author).
Configuration of your routes can be broken down into 5 categories:
- Basic Routes
- Collections
- Taxonomies, and
- Channels
Basic Routes
Basic routes are explicit routes. You specify the path word-for-word in your routes.yml file followed by the template you wish to load at the path.
For example, specifying the following routes in your routes.yml file will serve the features.hbs template at /features/ and the template team.hbs at /about/team.
routes:
  /features/: features
/about/team/: teamBasic routes with dynamic data
The basic routes in the previous example will load static templates with no dynamic data.
Alternatively, to connect a data source to your newly created route, you create a new line, specify the template followed by the data source.
Following the previous example, your routes.yml becomes
routes:
  /features/: features
  /about/team/:
    template: team
    data: page.team
Notice how the value drops to a new line, allowing you to specify two key-value pairs (template and data)
The part after data: (page.team in this instance) represents a link to the page in your admin with the slug of team, making the data from that page available to that template via the page contexts (contexts of course, will be covered the next section).
Interestingly, this practice prevents you from accessing the page at its original route. The official documentation states that this is "to prevent the content being duplicated in two places".
Of course, if you didn't specify this particular route, you would have still have access to the page data on the original route.
So the benefit of this approach it seems, is simply to nest the an existing page's path inside a subdirectory. So instead of the path to the team page being /team, it becomes /about/team.
Basic routes with custom formatting
Ghost also provides the option to easily serve a feed or API via the content_type key.
routes:
  /podcast/rss/:
    template: podcast-feed
content_type: text/xmlIn the above example, the podcast-feed.hbs template will load on the path /podcast/rss but the format will be text/xml (which is the required format for podcast RSS feeds) rather than HTML .
Alternatively, you can set the content_type to json and serve a simple JSON API.
Obviously, the code you place in your template file will need to match the content_type specified.
Collections
If we take a look back at our original example of a basic routes.yml file, you'll notice the following section.
collections:
  /:
    permalink: /{slug}/
template: indexThis tells Ghost two things. One, to serve an index of all posts on the homepage of the website through the index.hbs template and two, serve the posts within the collection via their slug with no nesting.
Don't be confused by the pluralisation of "collections". In Ghost, there is just a single collection containing all your posts.
What collections: allows you to do is to both change the location of the index and create multiple filtered indexes that pull from the same core collection but are defined by specific tags.
collections:
  /blog/:
    permalink: /blog/{slug}/
    template: index
In the above example, you can see that our index will now be served on /blog path and each post will be served at the path /blog/{slug}/.
This now gives us the space on the root path of the site to specify a homepage template like such:
routes:
  /: home
Now, the home.hbs template will be loaded at the root route instead of index.hbs.
Collection filtering
In the previous example, we saw how to move our index of posts off of the root path and onto the nested path of /blog/ but what we can also do is simulate multiple collections by tagging posts with certain tags and then creating paths with a specified filter.
For example...
collections:
  /blog/:
    permalink: /blog/{slug}/
    template: blog
    filter: primary_tag:blog
  /podcast/:
    permalink: /podcast/{slug}/
    template: podcast
filter: primary_tag:podcastIn the above example, we've separated out our blog posts and podcasts into two different 'collections' (remember there's only one collection from the perspective of the Ghost admin but we can simulate multiple on the front-end).
You'll see in the first route that blog.hbs is now the template for the path /blog/ and that any posts that don't have the primary tag of blog will be filtered out.
The second route uses the podcast.hbs template and has access to all the posts with the primary tag of podcast.
As it states in the official documentation...
"The primary_tag property is simply the first tag which is entered in the tag list inside Ghost’s editor. It’s useful to filter against the primary tag because it will always be unique."
This is an example of how we can host a blog and podcast on the same Ghost website.
Loading data into an index
Just like we saw with basic routes, you can also load additional data into an index template via the data attribute.
collections:
  /portfolio/:
    permalink: /work/{slug}/
    template: work
    filter: primary_tag:work
    data: tag.work
The above example passes the data from the tag 'work' into the work.hbs template.
Unlike Shopify, tags in Ghost hold additional data such as an image and description. Including it as a data source makes that data available in the template when accessed from the specified path.
Taxonomies
Taxonomies are groupings of posts based on a common relation. In Ghost, this is author and/or tag.
As we saw in the original default routes.yml example, we have default routes set up for automatic filtering of the collection via a tag or author.
taxonomies:
  tag: /tag/{slug}/
  author: /author/{slug}/
The above configuration will allow for filtering the collection based on a specific tag via the path of /tag/ followed by the slug of the tag and by a specific author via the path of /author/ followed by the slug of the author.
In order for this to work however, you will need a tag.hbs and/or an author.hbs (respectively).
Taxonomies are limited to just tags and authors in Ghost. The only possible modifications that you can make to the above routes is to change the path of these routes or remove them entirely.
Channels
Finally, Channels are custom streams of paginated content matching a specific filter. Ghost says you can "think of channels as a set of permanent search results. It’s a filtered slice of content from across your site, without modifying the content itself."
Channels are defined as a custom route, with a custom controller property called channel, and a filter to determine which posts to return.
routes:
  /apple-news/:
    controller: channel
    filter: tag:[iphone,ipad,mac]
  /editors-column/:
    controller: channel
    filter: tag:column+primary_author:cameron
As you can see from the above example, all that is required to turn a regular custom route into a channel is to add the controller: channel key-value pair and a filter attribute with the content you wish to filter by.
You might have noticed however, that the template keyword is missing from these custom routes. That's because the index.hbs file will be loaded by default.
If you wish to include a custom template for the channel, you can simply do so but adding in template: following by the template name (minus the .hbs extension) just like you have seen for the other routes.
Contexts
Now that we've discussed the structural side of Ghost themes, let's now look at how we can access dynamic data within each template.
In Ghost, this is done through something called 'Contexts'.
As it states on the official documentation:
"A Ghost publication follows a structure that allows URLs or routes to be mapped to views which display specific data. This data could be a list of posts, a single post or an RSS feed. It is the route that determines what data is meant to be shown and what template is used to render it."
The available data (ie. context) within each template depends on the route and what (if any) additional data we've passed into it.
The official Ghost documentation states that there are 6 different contexts.
- index
- page
- post
- author
- tag, and
- error
Let's address each of these contexts.
The Index Context
The official documentation appears to be missing a specific page discussing the index context but one thing is for sure, the index context, by its very nature is intended to display a list of posts.
{{#foreach posts}}
<article class="{{post_class}}">
<h2 class="post-title"><a href="{{url}}">{{title}}</a></h2>
<p>{{excerpt words="26"}} <a class="read-more" href="{{url}}">»</a></p>
<p class="post-footer">
Posted by {{primary_author}} {{tags prefix=" on "}} at <time class="post-date" datetime="{{date format='YYYY-MM-DD'}}">{{date format="DD MMMM YYYY"}}</time>
</p>
</article>
{{/foreach}}In the above example, we loop through an array of posts. The posts that are included in this array are of course, determined via the route.
For example, when viewing a channel route (discussed earlier), the filters you specified on that route will remove certain posts from the posts array.
By default, you would find this loop on the index.hbs template but could also exist in any number of optional collection templates such as tag.hbs and author.hbs.
Once inside a loop iteration, you're now inside a new context, the post context.
The Post Context
When you have access to a single post (whether that be inside a posts loop iteration or on a route for a single post), you are in the post context.
As we saw in the previous code example, once inside a posts loop iteration, we can access the data of the post directly.
In the case of a single post template, we need to enter the post context using the {{#post}}{{/post}} block expression (we'll go more in detail into helpers in the next section).
The documentation does a good job of listing the available attributes so I'll simply link you to the page on the post context here but a few obvious examples would be title, feature_image and of course, content.
Using Handlebars syntax, we simply open up the post context and then pull whatever attribute values we wish off of that post.
{{#post}}

<article class="{{post_class}}">
  <header class="post-header">
    <h1 class="post-title">{{title}}</h1>
    <section class="post-meta">
      <time class="post-date" datetime="{{date format='YYYY-MM-DD'}}">
        {{date format="DD MMMM YYYY"}}
      </time>
      {{tags prefix=" on "}}
    </section>
  </header>
  <section class="post-content">
    {{content}}
  </section>
</article>

{{/post}}
If for whatever reason, we didn't want to open up the post context via the {{#post}}{{/post}} block expression, we could access an attribute (or two) outside of the block expression by placing post. in front of the attribute like such:
<article class="{{post_class}}">
  <header class="post-header">
    <h1 class="post-title">{{post.title}}</h1>
  </header>
  <section class="post-content">
    {{post.excerpt}}
  </section>
</article>
These concepts extend to the other contexts of page, author, tag and error.
The Page Context
The page context is virtually identical to the post context. It is accessed using the same block expression of {{#post}}{{/post}} and has many of the same attributes.
The only difference between a post and a page is that a page exists outside of a loop-able collection and may be served on different templates (as we saw earlier).
The Author Context
When viewing the index page of a particular author, you have access to the Author context.
Attributes of the particular author can be accessed via the {{#author}}{{/author}} block expression. These include attributes like name (of the author), location and website.
The full list of attributes can be found on the official documentation.
The Tag Context
Similar to the Author context, the Tag context is available on the index page for a particular tag.
Attributes of the particular tag can be accessed via the {{#tag}}{{/tag}} block expression. These include attributes like name (of the tag), slug and feature_image.
The full list of attributes can be found on the official documentation.
The Error Context
When coding error templates, you have access to the Error context.
Access to the attributes of the Error context do not require any block expression.
These attributes are things like
{{statusCode}}— The HTTP status code of the error{{message}}— The error message{{errorDetails}}— An object containing further error details
Coding with Helpers
We seen examples throughout this article already but now let's go deeper into the syntax for coding Ghost themes and the 'helpers' that are available to us.
Handlebars
As mentioned, Ghost themes are coded using the popular templating language of Handlebars.
Handlebars comes with its own syntax that can be applied to any website so I won't go into too much detail regarding the syntax of Handlebars specifically but as it relates to Ghost theme development, here are some basics.
Simple Expressions
Simple expressions are the basic way of outputting data to the front-end (the core function of any templating language) and look like this {{ attribute }}.
If in a context where you have access to an attribute by the name of name for instance, you can simply render the value of name via the simple expression {{name}}.
Simple right?
Block Helpers
As we've seen in previous examples, we can enter the post context via the block expression {{#post}}{{/post}} and this works for other contexts like author and tag.
Inside, you can use a simple expression to access the attributes within that context.
Conditionals
Conditionals are used to execute certain code but only if a certain condition is met.
This is a basic concept in all templating/programming language and in Handlebars, it looks like this: {{#if condition}}{{/if}}.
For example
{{#post}}
  {{#if featured}}
   ...do something if the post is featured...
  {{/if}}
{{/post}}
Alternatively, you could use an unless statement as well (the opposite of 'if').
{{#unless featured}}
  ...do something...
{{/unless}}
Partials
Partials are a way of sectioning off chunks of reusable template code.
This is particularly handy in Ghost development for things like post previews which may exist inside multiple different loops.
In Ghost, we store partials in the /partials/ directory and call them by their file name (minus the .hbs).
A common example in Ghost theme development is - as mentioned - post previews.
For this particular example, if we had a file called post-card.hbs in our partials folder, we could bring in that code to our template via the code {{> "post-card"}}.
The partial code then gets loaded into the location where it called and has access to the same context.
Ghost-specific syntax
Now that we've covered some the basics of Handlebars that apply to Ghost theme development, let's look at some of the syntax specific to Ghost themes.
Loops
Loops in Ghost are performed via the special helper {{#foreach}}{{/foreach}}. This expression gives us immediate access to context of the item we're looping over.
For instance, inside each iteration of {{#foreach posts}}{{/foreach}} we have access to the post context. With these foreach loops, there is no need to use the {{#post}}{{/post}} helper to gain access to the context.
Inside a {{#foreach}} block, we also have access to a number of data variables, the list of which can be viewed on the official documentation.
Context verification
The {{#is}} helper allows you to check whether a certain context is available on the current route.
It takes a single parameter of a comma-separated list containing the contexts to check for. Similar to the has helper, the comma behaves as an or statement, with and being achieved by nesting helpers.
{{#is "post, page"}}
   ... content to render if the current route represents a post or a page ...
{{/is}}
The list of contexts that are supported by this helper can be found on the official documentation.
More advanced conditionals
The {{#has}} helper is a special kind of conditional in Ghost themes.
It supports four different types of “questions”:
- Post has tag or author
- Context has slug or id
- Context has any or all properties set
- Foreach loop number or index
With the 'questions' asked by providing attribute-value pairs, e.g. tag="tag name".
A few examples of each type can be found on the official documentation but for the most part, the 'has' helper is just a way to perform more complex conditionals than what is possible with {{#if}} helper.
Custom queries
{{#get}} is a special block helper that allows you to query data from your Ghost backend from wherever you are in the theme.
Let's say you wanted to access posts from within a context that does not have access to posts usually.
In that case, you can use {{#get}} to open up a query and place your code within it like such:
{{#get "posts"}}
    {{#foreach posts}}
        {{title}}
    {{/foreach}}
{{/get}}
You can also use parameters to limit the data requested which is discussed more in-depth on the official documentation.
Data helpers
In addition to the data within a specific context, there are also some global data helpers. These helpers are sometimes prefixed with the @ symbol and can be used on any template.
There's also the navigation helper which I'll cover more in-depth shortly.
Utility helpers
Utility helpers are used to perform minor, optional tasks.
For example, the {{body_class}} helper outputs different classes on different pages, depending on what context the page belongs to.
Also under this category are helpers like pagination and reading_time (which automatically renders an estimated reading time for a post).
A full listing of all of the data and utility helpers can be found here on the official documentation.
Special mention: the 'navigation' helper
In Ghost, the keyword navigation can appear in multiple ways.
Firstly, when placed in a foreach loop like such {{#foreach navigation}}{{/navigation}}, it allows for looping through a list of menu items as you would expect.
But, when used alone {{navigation}} will automatically call a partial by the same name or if the partial doesn't exist, it will automatically generate some default HTML for your site navigation.
You can also use the navigation attribute on the @site object to check if there are any navigation items at all.
For a full run-down on this special helper, visit the official documentation.
Special mention: the 'default' helper
Finally, it's important to note that, for the code in the default.hbs template to actually be included in any given template, you will need to include the special expression {{!< default}}.
All you have to do is place this tag at the top of your template file.
Any template without this tag will simply be rendered without the surrounding default.hbs code included.
Conclusion
In this guide, we've broken down Ghost themes into the main concepts I feel are important to understand in order to confidently build and edit Ghost themes.
There are of course, some things I have skipped over here like how assets are managed/served in Ghost as well as Ghost's membership capabilities (which I'm sure are very powerful but won't apply to most users).
Of course, the official Ghost documentation is the place to go for any of the smaller details but I hope that this guide has helped you get your head around Ghost theme development as much as it has helped me by writing it.
If you'd like to watch a visual training on Ghost with actual demonstrations of how to build out a Ghost theme, check out my Skillshare class to which this article is a compliment to.
Until next time,
Chris